

- Home
- Products
- HOT
- Technology
- Service
- Resources
- About
- Contact
- All
- Product Name
- Product Keyword
- Product Model
- Product Summary
- Product Description
- Multi Field Search

Views: 0 Author: Site Editor Publish Time: 2026-07-29 Origin: Site


Yes, you can take the cage off your ice hockey helmet. Many players eventually face this dilemma. You want the unobstructed visibility of a visor or an open face. You also want to avoid purchasing an entirely new helmet setup. Modifying protective equipment introduces significant variables. You must consider hardware compatibility and structural integrity. League compliance and severe facial injury risks also play a massive role.
Physically removing a cage is straightforward. However, the decision requires a technical evaluation. You must check the mounting points on your helmet. You must verify your warranty status. Most importantly, you must check your specific league regulations. We will guide you through the mechanics of helmet modification, safety trade-offs, and the exact steps to safely remove your cage without compromising your on-ice protection.
Physical Feasibility: Most modern ice hockey helmets are modular; cages can be removed using basic tools without damaging the core shell, provided the mounting hardware (J-clips, front screws) is handled correctly.
League Compliance is Mandatory: USA Hockey, Hockey Canada, and most sanctioned leagues strictly mandate full facial protection for players under 18; adult leagues vary, making rule verification the critical first step.
Warranty and Certification Risks: Removing factory-installed cages or improperly installing aftermarket visors can void HECC/CSA certifications and manufacturer warranties.
Sizing and Post-Removal Adjustments: Transitioning away from a cage requires manual adjustment of the helmet's expansion system to maintain a snug, safe fit, as the cage often acts as a stabilizing structural element.
Cost-Benefit Reality: Transitioning from an adult ice hockey helmet with cage to a visor setup requires purchasing the visor and compatible mounting hardware, which sometimes approaches the cost of a new helmet.
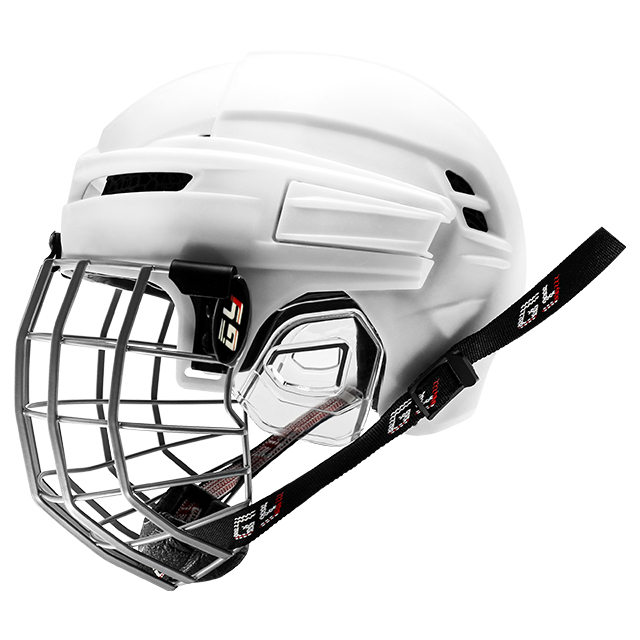
Modern helmets use a standardized modular system. The cage attaches at specific mounting points. These include side brackets called J-clips, front mounting screws or hinges, and chin strap snaps. Each component serves a distinct safety function. J-clips are critical. They absorb frontal impacts. They prevent the metal cage from driving backward into your jaw. When a player takes a shoulder to the face, the J-clips transfer that kinetic energy into the helmet shell rather than the facial bones.
Many players create a severe safety hazard by "hanging the cage." This means wearing the cage loose or removing the J-clips entirely. Hanging the cage compromises impact absorption. It often leads to severe facial injuries or concussions during heavy contact. Hardware degrades over time. Sweat and poor ventilation cause screws to rust. T-nuts inside the helmet shell can strip easily. You must inspect these components carefully before attempting any modifications. Rusted screws often require penetrating oil to remove without cracking the surrounding plastic.
You also need to understand the internal threading. Most helmets use standard threaded posts embedded in the foam or plastic shell. If you cross-thread a screw while removing or installing a cage, you ruin that mounting point permanently. Always use a manual screwdriver. Never use a power drill on helmet hardware. The torque will strip the plastic housing instantly.
You can buy head protection in different configurations. An Adult Ice Hockey Helmet with Cage is sold as a factory combo. You can also purchase a bare helmet and add facial protection separately. Factory combos use the exact same base shell as standalone helmets. The cage is simply a removable attachment. It is never a permanent structural component of the shell itself. Manufacturers assemble these combos for retail convenience.
Cage sizing does not always match helmet sizing. A player might wear a large helmet but use a medium cage. This accommodates a shorter face profile while maintaining proper crown protection. Always test hardware compatibility before swapping parts. Mismatched hardware stresses the helmet shell and reduces protective efficacy. If you force a wide cage onto a narrow helmet, you warp the shell. This warping compromises the foam's ability to absorb impacts.
When dealing with custom builds, you must ensure the brand of the cage aligns with the brand of the helmet. While many are universally compatible, the curvature of the forehead area varies. A cage that sits too far from the face offers poor downward visibility. A cage that sits too close risks impacting the nose during a collision.
Peripheral vision drives most players to remove their cages. A clear field of view improves puck tracking. It helps you spot passes in your periphery. Thick metal wires can obstruct downward vision. This makes stickhandling in tight spaces difficult. Players often feel they can react faster without bars in their line of sight.
You must weigh these visibility gains against severe physical risks. Adult recreational leagues feature unpredictable play. Stray sticks and deflected pucks happen frequently. The statistical probability of dental injuries skyrockets without full facial protection. A visor protects your eyes. It does absolutely nothing for your teeth, jaw, or chin. Evaluate your risk tolerance honestly before removing the cage. Dental reconstruction costs thousands of dollars. A cage prevents that entirely.
Consider the level of play. In highly skilled leagues, players have better stick control. In lower-level leagues, erratic stick movement is common. The risk of taking an accidental stick to the mouth is much higher when playing with beginners. Factor this into your decision.
Modifying your current setup involves hidden costs. You must purchase a standalone visor. You need compatible mounting hardware. You will also need anti-fog sprays and microfiber cloths for ongoing maintenance. Sometimes, buying these individual parts equals the cost of a brand new helmet setup. High-end visors can be quite expensive.
Beware of the sunk cost fallacy. Do not heavily modify an old, expired helmet. If the internal foams are hard or degrading, the helmet cannot protect your brain. Upgrading to current impact-protection technology is always a better investment than putting a new visor on a compromised shell. Check the foam density. If it feels like hard rock rather than firm cushion, throw the helmet away.
Here is a breakdown of typical modification components:
Standalone half-shield visor
Universal mounting hardware kit (spacers and screws)
Anti-fog spray or gel
Microfiber cleaning cloths
Replacement J-clips (if original ones are rusted)
Governing bodies enforce strict equipment mandates. USA Hockey and Hockey Canada require full facial protection for all minor hockey players. You cannot remove the cage if you play in these sanctioned youth leagues. There are no exceptions. Referees will eject players who step on the ice with illegal equipment.
Adult recreational leagues operate under different rules. Many adult leagues permit half-shields. Some allow players to skate with no facial protection at all. However, playing without a cage usually requires signing a strict liability waiver. Always consult your league director or rulebook before stepping on the ice with modified gear. Insurance coverage often depends on wearing certified, unaltered equipment.
College and junior leagues have their own specific mandates. Some require full cages, while others mandate specific types of visors. Never assume the rules of one league apply to another. Verify before you modify.
Helmet certification stickers dictate equipment legality. HECC and CSA test helmets for impact safety. These certifications expire after a set number of years. You can find the expiration date on the back of the helmet. Playing with an expired helmet voids league insurance policies.
Removing a cage does not inherently void the helmet's base certification. However, installing an uncertified visor will void it immediately. Drilling new holes into the shell voids all certifications and manufacturer warranties. You assume all liability if you structurally alter the helmet shell. Never modify the plastic shell to make an incompatible visor fit.
Modification Action | Effect on Certification | Effect on Warranty |
|---|---|---|
Removing factory cage | Maintained (if shell intact) | Maintained |
Installing certified visor in factory holes | Maintained | Maintained |
Drilling new holes for visor | Voided Immediately | Voided Immediately |
Using uncertified aftermarket hardware | Voided | Voided |
You only need a standard Phillips-head screwdriver for this process. Work on a flat, well-lit surface. Follow this sequential teardown process to avoid damaging the shell. If screws are stuck, apply a tiny drop of penetrating oil and wait ten minutes. Do not force a stripped screw.
Locate the two top hinges at the forehead of the helmet.
Unscrew the top screws carefully. Hold the T-nut inside the helmet if it spins.
Remove the side J-clips by unscrewing their mounting hardware.
Detach the chin cup and unthread the chin strap from the cage loops.
Place all screws, J-clips, and hinges in a labeled plastic bag. Retain this hardware for future use or resale.
Keep your hardware organized. Hockey helmet screws have specific lengths. Using a long screw in a short hole will puncture the internal foam and potentially scratch your head. Label the bag clearly.
Once the cage is off, inspect the bare shell. Look for micro-cracks around the drill holes. Check for rusted T-nuts buried inside the foam liner. Assess the padding for rot or severe compression. Sweat breaks down helmet glue over time. Ensure the foam blocks are still firmly attached to the plastic shell.
Evaluate the helmet for severe impact history. A hard impact might have dented the cage. That same impact likely transferred force into the helmet shell. If the mounting holes are cracked or elongated, the helmet must be retired immediately. You need a complete replacement, not just a cage swap. Never play in a cracked helmet.
Check the ear loops and chin strap anchors. These often degrade simultaneously with cage hardware. Replace any frayed straps before hitting the ice.
Removing the cage alters the structural tension of the helmet. The cage acts as a stabilizing brace. Without it, the helmet will feel looser. The weight distribution shifts entirely to the back and top. You will notice this immediately when you put the bare helmet on.
You must adjust the side or length expansion screws on the shell. Loosen the adjustment flaps or screws. Place the helmet on your head. Compress the shell until it fits snugly against your temples and crown. Lock the expansion system back into place. A proper fit prevents the helmet from shifting during play. Shake your head side to side. If the helmet wobbles, it is too loose.
Some modern helmets feature tool-less adjustment systems. Flip the latches open, adjust the fit, and snap them closed. Ensure these latches engage fully. A loose helmet offers zero protection during a backward fall.
Mounting a half-shield requires precision. You must use the existing front mounting holes. Never drill new holes. Most modern visors come with universal mounting kits. These kits include various spacer sizes to accommodate different helmet brands.
You will need spacers to mount the visor correctly. Spacers sit between the visor and the helmet shell. They ensure the visor curves naturally without warping the plastic shell. Using incorrect screw lengths will either fail to secure the visor or dig into your forehead through the internal foam. Test the visor alignment before tightening the screws completely. It should sit level across your face.
Ensure the visor does not rest on your nose. It should sit about an inch away from your face to allow proper airflow. Poor airflow leads to instant fogging on the bench.
The full clear shield offers a middle-ground solution. It provides the cage-free visibility of a visor. It maintains the full facial protection mandated by many leagues. Players call this setup the "fishbowl." It is popular among players who hate metal bars but want to keep their teeth.
Clear shields have distinct trade-offs. They restrict airflow significantly compared to wire cages. Fogging is a persistent issue. You must apply anti-fog treatments before every game. Scratches on the clear plastic can also distort your vision over time. You must transport a full shield in a protective helmet bag to prevent locker room damage.
Facial Protection Type | Visibility | Protection Level | Maintenance Required |
|---|---|---|---|
Wire Cage | Moderate (bars visible) | Maximum (full face/jaw) | Low (check for rust) |
Half-Shield (Visor) | High (clear forward view) | Low (eyes/upper face only) | High (anti-fog, scratch care) |
Full Clear Shield | High (unobstructed) | Maximum (full face/jaw) | High (anti-fog, scratch care) |
Many players try a visor and quickly revert to a cage after a close call with a stick. Reinstalling a cage is simple if you saved your original hardware. If you need a new cage, select the right material and wire shape. Do not mix and match old, rusted hardware with a new cage.
Steel cages are durable and traditional. Titanium cages are significantly lighter and resist rust better. You can choose between flat wire and round wire designs. Flat wires sit closer to the eyes and reduce visual obstruction. Ensure the chin cup sits snugly against your chin when the cage is locked into the J-clips. The chin cup absorbs upward impacts. If it hangs loose, an uppercut impact will drive your jaw shut violently.
Test the J-clip alignment. The cage should snap into the clips securely. If you have to force the cage into the clips, the cage is too wide or too narrow for your helmet shell. Adjust the cage width gently by pulling or pushing the sides before mounting.
Verify your local league rules regarding facial protection before making any modifications to your helmet.
Inspect your helmet shell for micro-cracks and rust immediately after removing the cage hardware.
Readjust the helmet's expansion system to ensure a snug fit, compensating for the loss of structural tension from the cage.
Store all removed J-clips, screws, and hinges in a secure, labeled bag for future reinstallation.
Apply anti-fog spray to any new visor installation before your first ice session to ensure clear visibility.
A: Most cages are universally compatible across major brands. However, sizing profiles differ. You must ensure the cage aligns properly with the J-clips and the chin cup rests securely on your chin.
A: Simply removing the cage does not void the warranty. Drilling new holes or structurally altering the shell to fit aftermarket accessories will void both the warranty and safety certifications.
A: The cage acts as a structural brace that pulls the sides of the helmet inward. Removing it releases this tension. You must manually readjust the helmet's sizing mechanisms to restore a tight fit.
A: Use a dedicated hockey visor anti-fog spray before every ice session. Wipe it entirely clean with a microfiber cloth. Avoid touching the inside of the visor with sweaty gloves.
A: No. Rust degrades the structural integrity of the metal welds. A rusted cage can break upon heavy impact, leading to severe facial injuries. Replace rusted hardware immediately.
A: Never use power tools on a hockey helmet. The torque will instantly strip the plastic shell and ruin the mounting points. Use a manual screwdriver and penetrating oil for stuck screws.


