

- Home
- Products
- HOT
- Technology
- Service
- Resources
- About
- Contact
- All
- Product Name
- Product Keyword
- Product Model
- Product Summary
- Product Description
- Multi Field Search

Views: 0 Author: Site Editor Publish Time: 2026-09-05 Origin: Site


An improperly fitted ice hockey helmet compromises the core function of the equipment—concussion and impact mitigation—regardless of the brand reputation or advanced technology. Players and parents frequently purchase helmets based on aesthetic preference, brand loyalty, or leaving room to grow. They often ignore head shape and precise measurements. This leads to severe discomfort, dangerous shifting during play, and compromised safety on the ice. A loose shell rattles upon impact, while a tight one causes severe headaches that distract you from the game.
Establishing a reliable, step-by-step framework for measuring head circumference is essential. You must identify head shape profiles and choose age-appropriate configurations. Executing technical adjustments ensures maximum protection and comfort. A well-fitted helmet acts as a cohesive unit with your head, absorbing and dispersing impact energy effectively. We will break down exactly how to measure, evaluate, and adjust your gear for optimal safety.
Measurement is the Baseline, Not the Final Answer: Head circumference dictates the initial size bracket, but internal helmet volume, shell shape, and brand-specific molds determine the actual fit.
The "Firm Handshake" Standard: A correctly fitted ice hockey helmet provides uniform, snug pressure around the entire head without localized pinch points or temple restriction.
Shape Compatibility Matters: Identifying whether you need a standard oval fit or a specific ice hockey helmet for round heads is critical before evaluating brands.
Avoid the "Growth Room" Trap: Buying a larger youth helmet to last multiple seasons leaves dangerous gaps that drastically increase the risk of head injury.
Independent Cage Sizing: Facial protection (cages, shields, and visors) must be sized independently of the helmet shell to ensure the chin cup rests securely on the jaw.
Establishing accurate baseline metrics helps you avoid the common pitfall of buying a helmet that is too large. A loose helmet drastically reduces impact dispersion. It allows the shell to rotate upon impact, leaving vulnerable areas of the skull exposed to the boards or the ice. You need precise numbers before you even look at a sizing chart. Guessing your size based on baseball hat measurements rarely translates accurately to hockey equipment.
You need the right tools to get an accurate measurement. A flexible tailor’s tape measure works best. If you lack one, use a piece of string and measure it against a standard rigid metal tape measure afterward. Do not use a metal tape measure directly on your head, as it will not contour properly and will yield an inaccurate reading.
Position the tape correctly on the head. Place it exactly one inch, or roughly one finger's width, above the eyebrows.
Wrap the tape around the widest part of the back of the head. Keep the tape level across the temples.
Pull the tape snug, but do not compress the skin or flatten the hair too aggressively.
Record the measurements in both inches and centimeters. Global manufacturer charts often use both metrics interchangeably, but centimeters provide a more granular baseline.
Once you have your measurement, you must consult brand-specific charts. Sizing is not universal across the hockey industry. A medium in one brand might fit like a large in another. The internal padding thickness and shell geometry vary wildly between product lines.
You will often notice an overlap between sizes. For example, a measurement of 57 centimeters might fall at the absolute top of a Medium and the very bottom of a Large. Brand sizing variances play a huge role here. Bauer, CCM, and Warrior charts differ significantly in shell circumference and internal volume. Sizing down is generally recommended when you are caught between sizes. You can expand a smaller helmet to achieve a snug fit. You cannot contract a larger helmet past its minimum setting, which often leaves dangerous gaps around the temples and occipital bone.
Measurement (cm) | Typical Size Bracket | Adjustment Recommendation | Common Fit Issues |
|---|---|---|---|
51 - 54 cm | Small | Expand shell fully before fitting. | Pinching at the temples if not expanded. |
55 - 58 cm | Medium | Test for temple pressure; adjust length. | Forehead gaps if the shell is too long. |
59 - 62 cm | Large | Check for excess volume at the crown. | Wobbling side-to-side on narrow heads. |
63+ cm | Extra Large | Ensure maximum depth seating. | Helmet sitting too high on the crown. |
Parents frequently make the error of buying a size up for growth. This is a critical safety hazard. A helmet must fit perfectly today to protect a developing brain. Excess space allows the head to accelerate inside the shell during a collision, increasing concussion risk. The foam needs to sit flush against the skull to decelerate the impact force properly.
Evaluate a proper youth fit by ensuring stability. The helmet should not rely on thick beanies or skull caps to fill the void. If a child shakes their head and the helmet wobbles, it is too large. Buy the size that fits their current head measurements securely. Equipment managers see this constantly: a kid takes a minor hit, and the oversized helmet spins backward, exposing the forehead to the ice.
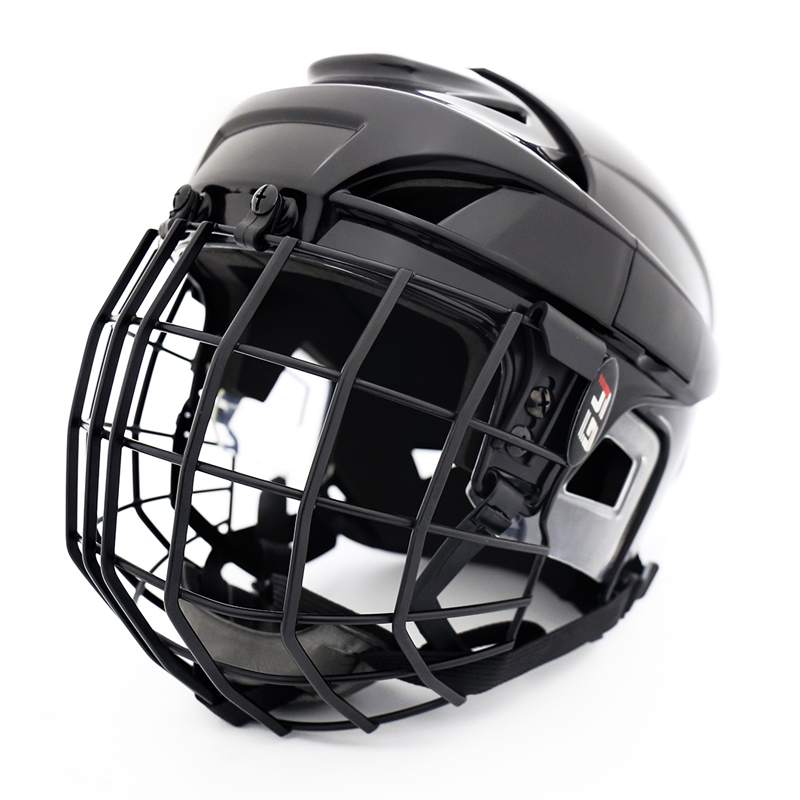
Categorizing helmets by their internal mold profiles is just as important as external features. Two players with the exact same head circumference might need completely different helmets based on their head shape. The industry generally divides head shapes into oval and round profiles. Ignoring this distinction guarantees a bad fit.
You must assess pressure points to determine your head shape. Side-to-side pressure at the temples indicates you have a round head stuck in an oval helmet. Front-to-back pressure on the forehead and occipital bone indicates an oval head in a round helmet. Pay attention to where the foam digs into your skin after wearing the gear for five minutes.
If you experience temple pinching, you need specific shell designs. Evaluating brand tendencies helps accommodate wider temples. Some models feature wider, rounder internal volumes designed specifically for this profile. Finding a dedicated Ice Hockey Helmet for Round Heads eliminates the painful squeeze that causes mid-game headaches. You want a shell that accommodates width without requiring you to size up to a Large, which would leave massive gaps at the forehead.
Consider the trade-offs of adjustment systems. Tool-less adjustment systems in wider helmet models offer quick sizing changes on the bench. Traditional side-screw expansion systems often provide a more rigid, locked-in feel once set, though they require a screwdriver. Tool-less flaps can sometimes pop open during heavy board battles, whereas screws stay locked until you manually turn them.
Optimal snugness is defined by the "firm handshake" test. The helmet should feel secure enough that the skin on your forehead and temples moves with the helmet when shifted. It must not be so restrictive that it causes headaches or throbbing. Uniform contact around the entire perimeter of the head is the ultimate goal. You should not be able to slide a finger easily between the padding and your temples.
Preventing user error during the initial setup phase is critical. Many players believe a helmet does not fit when it simply has not been properly adjusted. Follow these steps to ensure a secure fit before hitting the ice.
Maximize the Shell Size: Locate the adjustment mechanisms on the helmet. These may be tool-less side clips, rear dials, or traditional side screws. Expand the helmet to its maximum length and volume before placing it on your head. This prevents unnecessary friction against your temples and allows the helmet to seat properly on the crown.
Positioning on the Head: Place the helmet on your head. Set the front edge exactly one finger's width above your eyebrows. This is approximately 0.5 to 1 inch. Ensure the helmet sits level. It should not tilt back to expose the forehead. It should not tilt forward to obstruct your vision.
Locking and Compressing the Shell: Compress the front and back halves of the helmet together. Do this until a snug, uniform fit is achieved around the crown and temples. Once you find that firm handshake feel, lock the clips, dials, or tighten the screws securely. This locks the shell in place permanently.
Securing the Chin Strap: Adjust the chin strap length carefully. No more than one or two fingers should fit between the strap and your throat. Proper strap tension mitigates the risk of the helmet rolling off your head backward during an impact.
Post-Adjustment Safety Checks: Perform the Shake Test by shaking your head vigorously side-to-side and up-and-down. The helmet should not shift or slide independently of your skin. Next, perform the Push Test. Push upward on the front brim of the helmet. It should not expose your forehead or slip backward over your crown.
Ensuring that the addition of facial protection does not alter the fit, balance, or safety profile of the helmet shell is vital. A poorly fitted cage can pull a perfectly fitted helmet out of alignment, dragging the front brim down over your eyes or pushing the chin cup into your throat.
Understand that a Medium helmet may require a Large or Small cage depending on your face length. Combo units often pair identical sizes, but custom setups allow for mixing. Evaluate the fit of the chin cup closely. It must rest firmly and centered on the chin. It should not dangle below the jaw or press upward into the throat and mouth. If you have a long jawline, you might need a Large cage on a Medium shell.
Position and adjust the J-clips on the temples correctly. These clips prevent the cage from smashing into your face during a direct front collision. Adjust the side straps so they snap securely to the dome snaps on the helmet. They should hold the cage closed without pulling the helmet down or causing the shell to distort. If the side straps are too tight, they will warp the plastic shell inward, creating artificial pressure points on your temples.
Facemask mandates are strictly enforced. All youth, junior, high school, and college players are legally required to wear full facial protection. Verify the HECC (USA), CSA (Canada), and CE (Europe) certification stickers on the back of the helmet. Referees will check these during pre-game warmups.
Understand certification expiration dates. These are typically 6.5 years from the date of manufacture. Expired helmets are illegal in sanctioned play. More importantly, the internal foams degrade over time, making them structurally compromised and unsafe for impact. Sweat, heat, and repeated minor impacts break down the cellular structure of the foam, rendering it useless even if the plastic shell looks brand new.
Balancing comfort, weight, interior foam types (EPP vs. VN foam), and protection levels is necessary when evaluating a final purchase. Sometimes, a fit issue requires troubleshooting rather than a completely new helmet. Knowing how to diagnose the problem saves time and frustration.
Diagnose whether the issue is a sizing error or a head shape mismatch. If you expanded the helmet fully and still feel temple pressure, the shape is wrong. Breaking in an Ice Hockey Helmet is a dangerous myth. The structural impact-absorbing foam is designed to withstand high impacts. It is not designed to deform, soften, or mold to a head over time. If it hurts on day one, it will hurt on day one hundred. Do not attempt to heat or crush the foam to make it fit.
Identify the cause of excessive movement. It usually stems from excessive internal volume, worn-out internal padding, or improper chin strap tension. If the cage tension is too high, it can also pull the helmet down over your eyes. Readjust all straps before assuming the shell is too large. Check the internal foam blocks; if they are unglued or compressed from years of use, the helmet will shift regardless of how tight you make the shell.
Recognize when a helmet cannot be salvaged through adjustment. You require a replacement if you find hardened VN foam, cracked plastic shells, rusted or missing hardware, or expired safety stickers. Never compromise on structural integrity to save money. A cracked shell cannot distribute force, meaning the impact goes straight to your skull.
An ice hockey helmet is the single most critical piece of safety equipment. Its efficacy is entirely dependent on a precise, customized fit rather than brand prestige or aesthetic design. A poorly fitted helmet leaves you vulnerable to severe injury, regardless of how much you paid for it. Take the time to measure, test, and adjust your gear properly.
Consult brand-specific manufacturer sizing charts using your exact tape measurements.
Test multiple brands and models to identify which internal mold matches your specific head shape.
Conduct physical shake and push tests after adjusting the shell to maximum volume and compressing it to fit.
Ensure any purchased helmet retains valid, unexpired HECC or CSA safety certifications.
A: It should feel like a firm handshake around your entire head. The skin on your forehead should move with the helmet when shifted. It must be snug enough to prevent wobbling, but not so tight that it causes pressure points or headaches.
A: Yes, most modern cages and shields are universally compatible across major brands. However, you must ensure the J-clips and dome snaps align correctly without warping the helmet shell or pulling it out of its proper position on your head.
A: If you experience severe pinching or pressure on the sides of your head while having excess space at the front and back, you likely have a round head. You need a helmet model designed with a wider internal volume.
A: The chin cup should rest firmly and securely directly on the point of your chin. It should not slide up into your mouth or throat, nor should it hang loosely below your jawline.
A: Helmets typically expire 6.5 years from the date of manufacture. You can find the exact expiration date on the HECC or CSA certification sticker located on the back of the helmet. Expired helmets are unsafe and illegal in sanctioned leagues.
A: Headaches are usually caused by a mismatch in head shape rather than just size. Wearing an oval-profile helmet on a round head causes severe temple compression. Helmet foams do not break in, so you must replace it with a wider model.


