

- Home
- Products
- HOT
- Technology
- Service
- Resources
- About
- Contact
- All
- Product Name
- Product Keyword
- Product Model
- Product Summary
- Product Description
- Multi Field Search

Views: 0 Author: Site Editor Publish Time: 2026-09-03 Origin: Site


The most advanced materials in the world cannot protect a goaltender if their ice hockey helmet does not fit correctly. A poorly fitted mask actively increases the risk of concussions and facial trauma by failing to disperse impact energy properly. When a puck strikes the shell at high velocity, the internal foams must immediately absorb and distribute that force across the largest possible surface area of your head. Gaps between your face and the padding allow the mask to shift upon impact, driving the rigid fiberglass or carbon shell directly into your skull or exposing vulnerable areas like the temples and jaw. We will introduce a systematic, evidence-based framework for measuring, evaluating, and adjusting your gear. You will learn how to ensure maximum protection, visibility, and compliance with safety standards through precise sizing protocols. Proper fitting is an objective process that requires specific measurements, dynamic testing, and a clear understanding of shell geometry.
Zero-Tolerance Wiggle Room: A proper fit requires continuous, snug contact across the forehead, cheeks, and chin without localized pressure points.
Measurement Precedes Selection: Head circumference dictates the baseline size, but individual facial structure determines the correct shell mold and brand.
Harness and Backplate Geometry: The backplate must sit flush inside the shell edges; over-tightening straps to compensate for a too-large shell compromises structural integrity.
Certification is Mandatory: Verification of valid safety certifications (such as a CE Approved Ice Hockey Goalie Helmet) is a non-negotiable baseline before evaluating fit.
Establishing the baseline success criteria for a safe fit requires understanding the mechanical difference between snug and tight. The mask must compress the internal foams slightly against the skin to create a unified structure between the head and the helmet. You should not experience tension headaches, restricted jaw movement, or pinching that cuts off circulation. The foam acts as the primary shock absorber and requires direct, uninterrupted skin contact to function effectively. If the foam floats above the skin, the puck's kinetic energy will accelerate the mask into your face before the foam can compress.
Flush contact along the sweatband area is non-negotiable. The forehead foam must sit completely flat against the skin, spanning from the brow line up to the hairline. Gaps at the temples allow lateral energy transfer during side impacts. This causes the helmet to shift violently upon contact. A side impact on a loose mask will rotate the shell, exposing the ear and temple to secondary impacts from sticks, skates, or the ice surface itself. When you press the front of the cage toward your face, the forehead foam should not compress more than a few millimeters. If it bottoms out against the hard shell, the foam density is either compromised or the fit is entirely wrong.
Continuous foam contact must extend down the cheekbones to the jawline. You cannot have gaps between the inner foam and the sides of the face. Cheek contact prevents the mask from rotating vertically. It stops the mask from twisting during downward or offset impacts, such as a puck deflecting off the collarbone up into the chin. If you can open your mouth fully without feeling the cheek pads compress slightly against your skin, the fit is too loose. The cheeks act as the lateral stabilizers for the entire helmet system. Without firm cheek pressure, the mask relies entirely on the chin cup and forehead, creating a dangerous pivot point.
The chin cup acts as the primary anchor point for the entire system. It must cup the chin firmly to prevent upward rotation. All straps must be fastened to pull the chin cup snugly against the chin. A floating or loose chin cup presents severe risks. Upon impact, a loose mask will drive the chin cup into the throat or force the upper shell down into the bridge of the nose. The chin sling or cup should be adjusted so that when you yell or communicate on the ice, the mask does not pull down over your eyes. The tension should be firm but allow for the natural articulation of the jaw during heavy breathing.
Fit Zone | Correct Fit Indicator | Incorrect Fit Indicator (Too Loose) | Incorrect Fit Indicator (Too Tight) |
|---|---|---|---|
Forehead | Foam sits flat, slight compression | Visible gap, mask slides down | Red marks, tension headaches |
Temples | Continuous contact, no gaps | Can slide a finger between foam and skin | Pinching, throbbing sensation |
Cheeks | Firm pressure, moves with jaw | No contact when mouth is open | Biting inside of cheeks when talking |
Chin | Cup anchors firmly on the point of chin | Cup floats below chin or rests on throat | Restricts breathing or speaking |
Sizing is an objective metric, not a subjective guess. Baseline data collection forms the foundation of a safe fit. You must measure accurately before ever trying on a shell. Guessing your size based on your player helmet or a baseball cap guarantees an improper fit. Goalie masks require a much higher degree of precision due to the rigid nature of the fiberglass, Kevlar, or carbon fiber shells.
Use a soft tailor’s tape measure for accurate readings. Position the tape exactly one inch above the eyebrows. Cross the temples directly. Wrap the tape around the widest part of the occipital bone at the back of the head. Keep the tape level across the entire circumference. Record the measurement in both inches and centimeters. Do not use a metal construction tape measure, as it will not contour to the skull and will provide an artificially large reading. Take the measurement three times and average the results to eliminate user error. If the goalie has thick hair, compress the hair slightly to get a true reading of the skull's circumference.
Sizing charts vary significantly between major Ice Hockey Helmet manufacturers. A medium in one brand often fits like a large in another. When a measurement falls exactly between two sizes, always test the smaller size first. This allows you to evaluate foam compression accurately. A shell that is slightly too large cannot be safely modified to fit, whereas a shell that is slightly snug will often break in as the foams warm up and mold to the face. Always consult the specific manufacturer's sizing chart for the exact model year you are purchasing, as shell molds are frequently updated and resized.
Head Circumference (Inches) | Head Circumference (cm) | Typical Size Category | Fit Profile Expectation |
|---|---|---|---|
20.0" - 21.2" | 51 - 54 | Small | Narrow jaw, shallow crown |
21.2" - 22.4" | 54 - 57 | Medium | Standard profile, balanced cheeks |
22.4" - 23.6" | 57 - 60 | Large | Wide temples, deep occipital lock |
23.6" - 24.8" | 60 - 63 | Extra Large | Wide jaw, elongated oval profile |
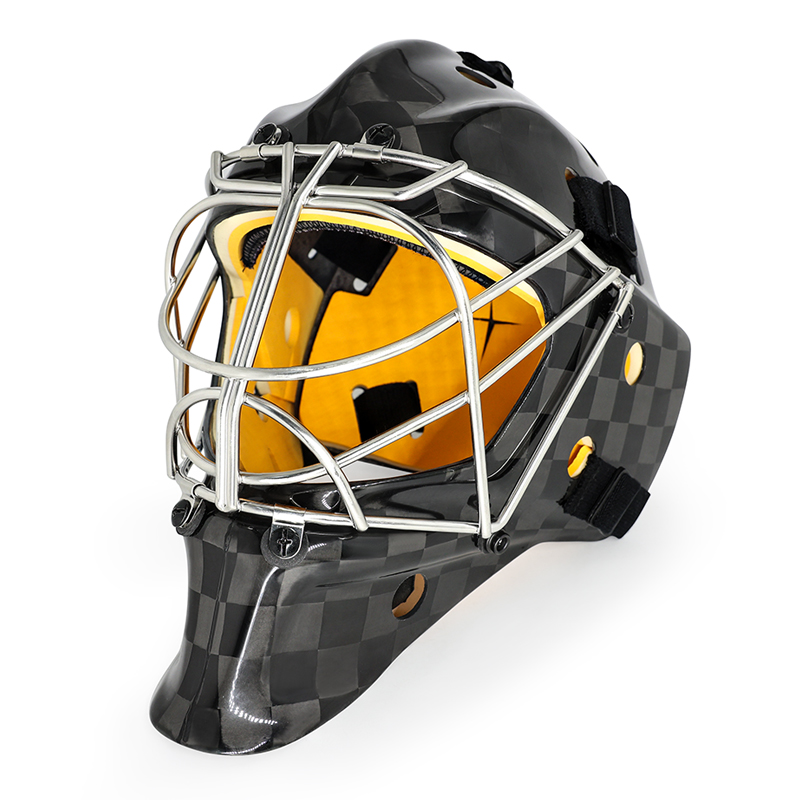
A correct circumference measurement does not guarantee a correct fit. The shell mold must match the goaltender's specific face shape. Forcing a round face into a narrow shell causes severe safety issues and extreme discomfort. The rigid outer shell will not flex to accommodate your face. If the geometry of the shell clashes with your bone structure, the helmet will fail to protect you regardless of the circumference measurement.
Industry-standard shell profiles differ by design. Some brands favor narrow, angular jawlines that taper aggressively toward the chin. Others accommodate rounder, wider facial profiles with a more barrel-like cheek section. Pinching at the temples or jaw pain indicates a shell is too narrow. Lateral shifting and an inability to secure the cheeks indicate a shell is too wide. You must identify your facial profile—oval, round, square, or heart-shaped—and match it to the corresponding shell family. Trying to fix a width mismatch by cranking down the backplate straps will only warp the backplate and cause severe headaches.
Aftermarket foam kits can resolve minor fit discrepancies. They help accommodate specialized facial contours like asymmetrical cheekbones or a pronounced brow ridge. Establish strict boundaries when modifying gear. You may add high-density foam to secure a fit and eliminate small gaps. You must never remove structural factory foam to accommodate a mask that is too small. Removing factory foam voids certifications and destroys impact resistance. If you feel a pressure point that requires removing foam, you are in the wrong shell size or the wrong brand entirely. Only use manufacturer-approved replacement foams that match the original density specifications.
Transition from static measurements to active, physical testing. Dynamic fit evaluation reveals flaws that static measurements miss. A mask might feel fine when you are standing still in a locker room, but it must perform under the violent, rapid movements of actual gameplay.
Have the goaltender shake their head vigorously up and down, then left and right. Any independent movement of the mask separate from the skin indicates a failed fit. Little-to-no wiggle room is acceptable. The skin on the forehead should move with the internal foam. If the mask lags behind the head movement or over-rotates past the stopping point of the head, the internal volume of the shell is too large. This test simulates tracking a cross-ice pass or snapping the head around to locate a rebound.
Perform a visual inspection around the forehead, cheeks, and temples. Execute the credit card test. Try to slide a standard plastic card between the foam and the forehead or cheeks. If the card slides easily, the fit is too loose. The foam must grip the card tightly. Have a coach or equipment manager shine a flashlight from the top of the mask down toward the chin. If light passes through gaps between the foam and the temples, the mask fails the visual inspection.
Signs the Mask is Too Big: The mask slips or covers the eyes during the Shake Test. The chin cup floats without touching the chin. Gaps are visible at the temples. The backplate overlaps the shell outer lip.
Signs the Mask is Too Small: You feel extreme pressure or see red marks at the temples. The forehead foam does not reach the brow line. The backplate leaves a massive gap exposing the skull.
Signs of Improper Shell Shape: The forehead fits perfectly but the cheeks have massive gaps. The cheeks are painfully tight but the forehead foam does not touch the skin.
The geometric relationship between the backplate and the main shell dictates structural integrity. The backplate should rest securely inside the outer shell's lip. It must not overlap or expose the back of the head. A five-point harness must distribute tension evenly. Do not rely on one or two straps to hold the mask in place. The top strap controls the vertical height of the mask. The middle straps pull the mask horizontally against the face. The bottom straps anchor the chin cup. Adjust them systematically, starting from the top and working down, ensuring the backplate remains centered.
Take reference photos from three critical angles. Capture a straight-on front view, a profile side view, and a rear harness view. Use these photos to verify alignment. Seek professional or community verification if you are unsure about the backplate seating. A profile photo will clearly show if the mask is tilted too far forward, exposing the neck, or tilted too far back, exposing the throat. The rear photo will confirm if the backplate is centered and sitting flush within the flange of the main shell.
Frame certifications as the primary filter for any purchasing decision. Do not evaluate the fit of an uncertified mask. A mask without proper certification is a novelty item, not protective equipment. The materials used in uncertified masks will shatter under the impact of a standard adult slapshot.
European conformity standards represent rigorous impact testing. A CE Approved Ice Hockey Goalie Helmet has passed specific kinetic energy displacement tests. Locate and verify CE, HECC, and CSA certification stickers on the backplate. Missing stickers indicate the mask is either expired, counterfeit, or designed for street hockey. These testing bodies subject the masks to high-velocity puck impacts at various ambient temperatures to ensure the shell does not crack and the foams absorb the required amount of force.
An ice hockey helmet typically lasts three to five years depending on the certification board. Internal foams like VN or EPP degrade over time. Sweat, hair oils, and temperature changes break down the cellular structure. This alters the fit and renders the helmet unsafe even if the exterior shell remains perfectly intact. Hardened, brittle foam transfers impact energy directly to the skull instead of absorbing it. Inspect your foams monthly. If you press your thumb into the foam and it does not rebound immediately, or if it feels rock-hard, the helmet must be retired or professionally refurbished with new certified foams.
Mitigating user error prevents catastrophic injuries on the ice. Avoid these frequent sizing mistakes that compromise the structural integrity of the mask and put the goaltender at severe risk.
Using straps to compensate for a too-large shell size causes severe pressure headaches. It risks warping the shell over time. Straps secure a properly fitted mask. They do not create the fit. If you must pull the straps to their maximum limit, the shell is too large. Over-tightening pulls the backplate flat, destroying its natural curve and reducing its ability to deflect impacts to the back of the head.
Buying a larger mask for a youth goalie to grow into presents severe danger. Oversized masks cause rotational concussions. They expose the neck and throat during scrambles in the crease. A youth goalie must wear a mask that fits their current head measurements perfectly. The cost of replacing a mask as the child grows is negligible compared to the medical and neurological costs of a severe brain injury caused by ill-fitting equipment.
An improper fit severely affects sightlines through the cage. A mask sitting too low obscures upward vision, making it hard to track high shots or pucks in the air. A mask sitting too high exposes the throat and collarbone to direct puck impacts. The goaltender's eyes should align perfectly with the primary viewing window of the cage. If the goaltender has to tilt their head unnaturally to see the ice, the mask is seated incorrectly on the crown of the head.
Fit supersedes brand loyalty, aesthetic design, and price point. An entry-level, perfectly fitted mask is significantly safer than a poorly fitted elite-level mask. Measure your circumference first. Select the shell shape based on your facial profile. Verify all safety certifications. Perform visual, dynamic, and photographic testing before hitting the ice.
Measure your exact head circumference using a soft tailor's tape across the forehead and occipital bone.
Test at least three different shell models within your size bracket to identify the correct facial profile match.
Execute the dynamic shake test and the credit card gap test to verify continuous foam contact.
Adjust the five-point harness systematically from top to bottom to center the backplate.
Consult a professional equipment manager to evaluate your photographic fit audit before using the mask in gameplay.
A: A goalie mask should fit snugly against the forehead, cheeks, and chin. It must compress the internal foams slightly against the skin without causing headaches or restricting jaw movement. There should be zero independent movement during head rotations.
A: Your helmet is too small if you experience extreme pressure at the temples, the forehead foam sits above the brow line, or the backplate sits entirely outside the shell flange, exposing the back of your head.
A: Yes, you can add aftermarket foam kits to resolve minor fit discrepancies or fill small gaps. However, you must never remove factory structural foam to make a small mask fit, as this destroys impact resistance.
A: Goalie masks require continuous facial contact down the cheeks and utilize a backplate with a five-point harness for full-head encapsulation. Player helmets primarily secure around the crown and temples using a two-piece adjustable shell.
A: Your mask shifts because the shell is too wide for your face, or the internal foams are not making continuous contact with your cheeks and temples. This indicates a failed fit that requires a different shell mold.
A: Certified helmets use standardized, high-density impact foams that may feel stiffer initially than the soft padding found in uncertified novelty masks. The certification ensures the foam density is calibrated for actual puck impacts.
A: You should inspect the foam regularly and replace the mask or foam every three to five years. Sweat, oils, and temperature fluctuations degrade the foam's cellular structure, compromising both the fit and impact absorption.


